How to Generate NSFW AI Video: Step-by-Step Tutorial
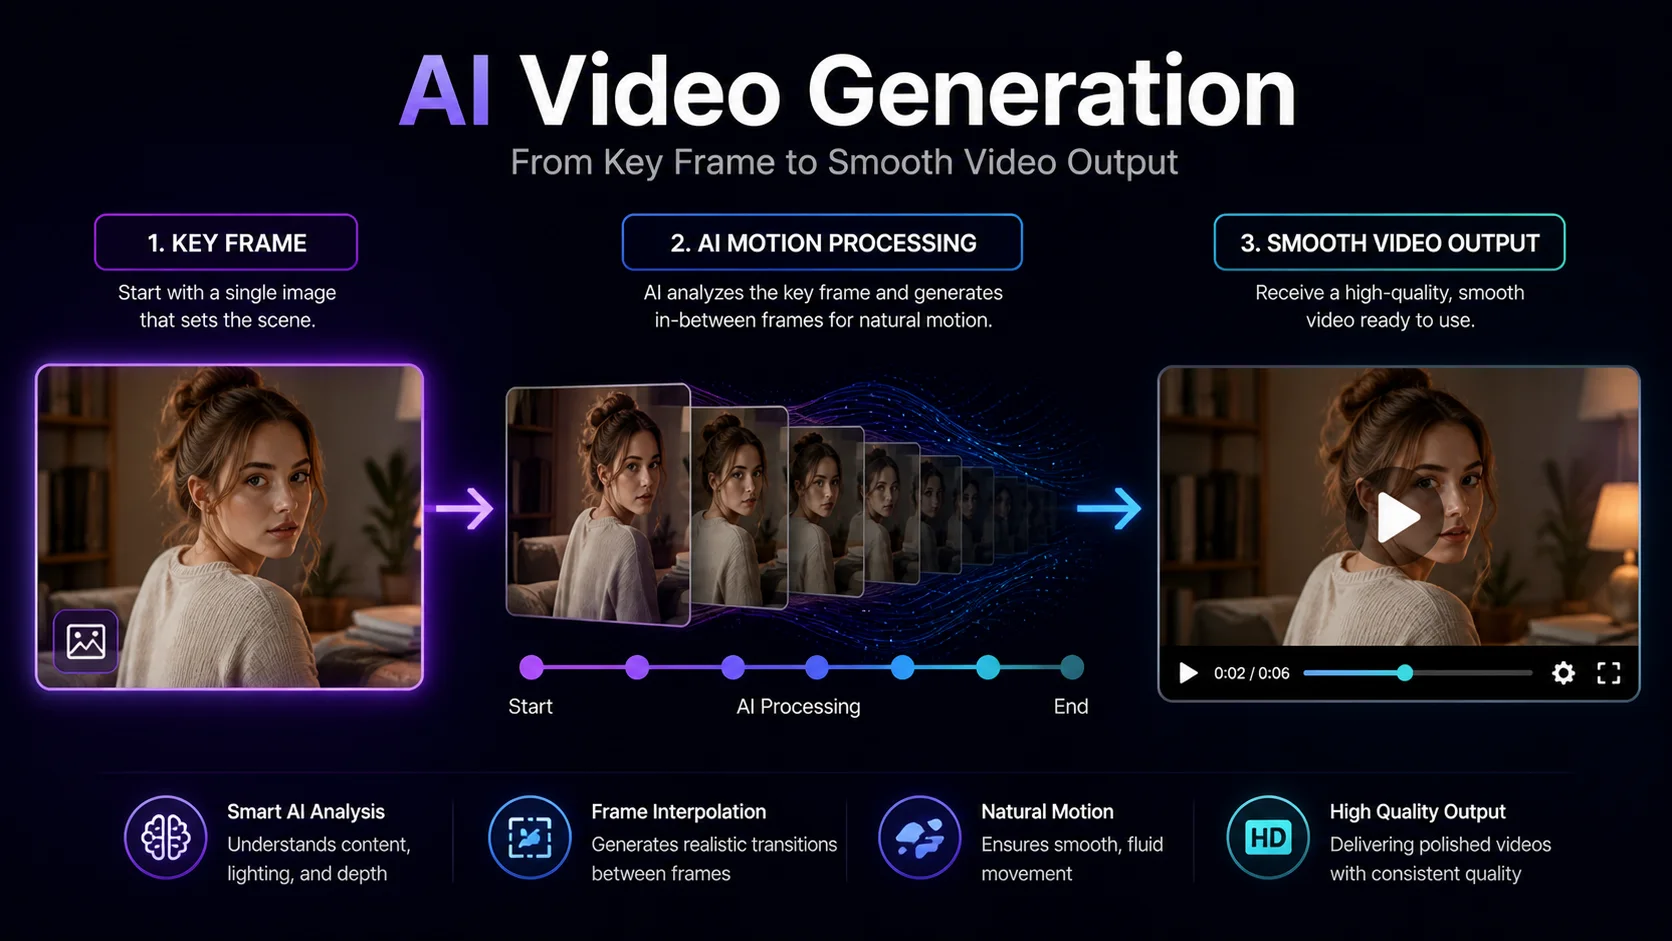
AI-generated video has progressed from choppy, distorted clips to surprisingly smooth motion sequences in under two years. While NSFW AI image generation matured first, video generation tools have caught up rapidly. Multiple platforms and open-source models now produce adult video content ranging from short animated loops to multi-second scenes with consistent character movement.
The process differs from image generation in several important ways. Frame consistency, motion coherence, temporal smoothing, and rendering time all add complexity that static images never deal with. This tutorial explains each step of NSFW AI video generation—from choosing the right tool to exporting a polished final clip.
Understanding AI Video Generation
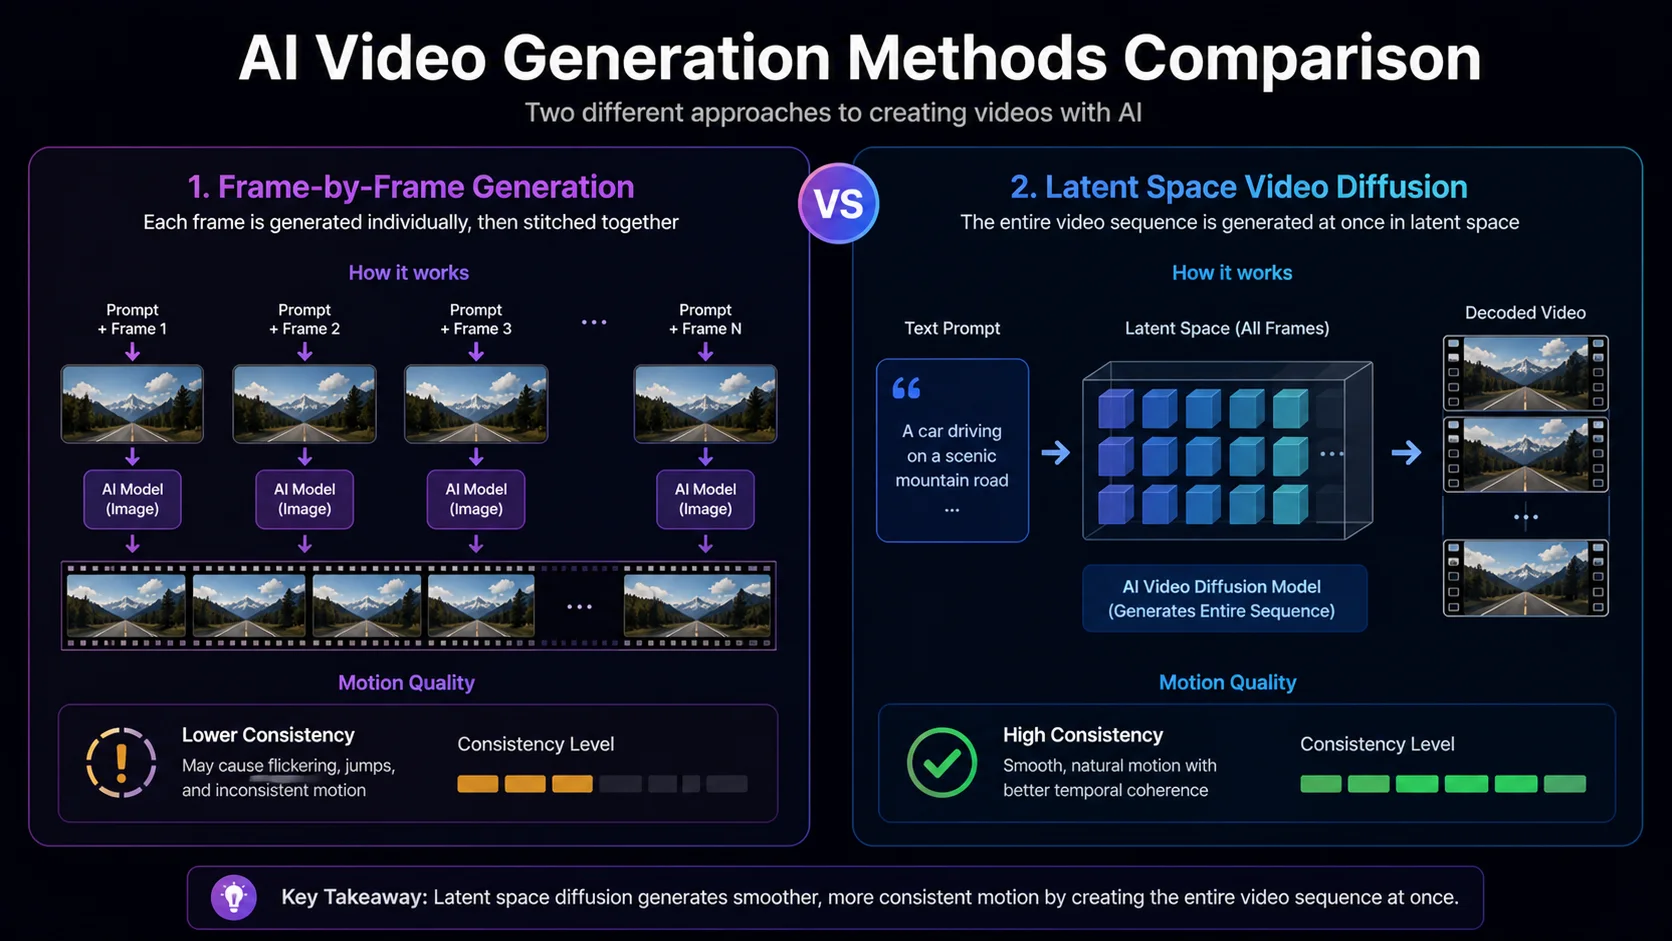
AI video generation works through one of two primary methods:
Frame-by-Frame Generation
The AI generates individual frames as separate images, then stitches them together into a video sequence. Each frame uses the previous frame as a reference to maintain consistency. This method offers high per-frame quality but can produce flickering or inconsistent details between frames if the settings aren’t optimized.
Latent Space Video Diffusion
Newer models like AnimateDiff, Stable Video Diffusion, and similar architectures generate video directly in compressed latent space. Instead of creating individual frames, the model produces an entire sequence at once, with built-in temporal consistency. Motion looks smoother because the AI plans the entire movement arc rather than generating one frame at a time.
Most modern NSFW video tools use latent space diffusion or hybrid approaches that combine both methods. The result is smoother motion and better consistency than pure frame-by-frame generation.
Best Tools for NSFW AI Video Generation
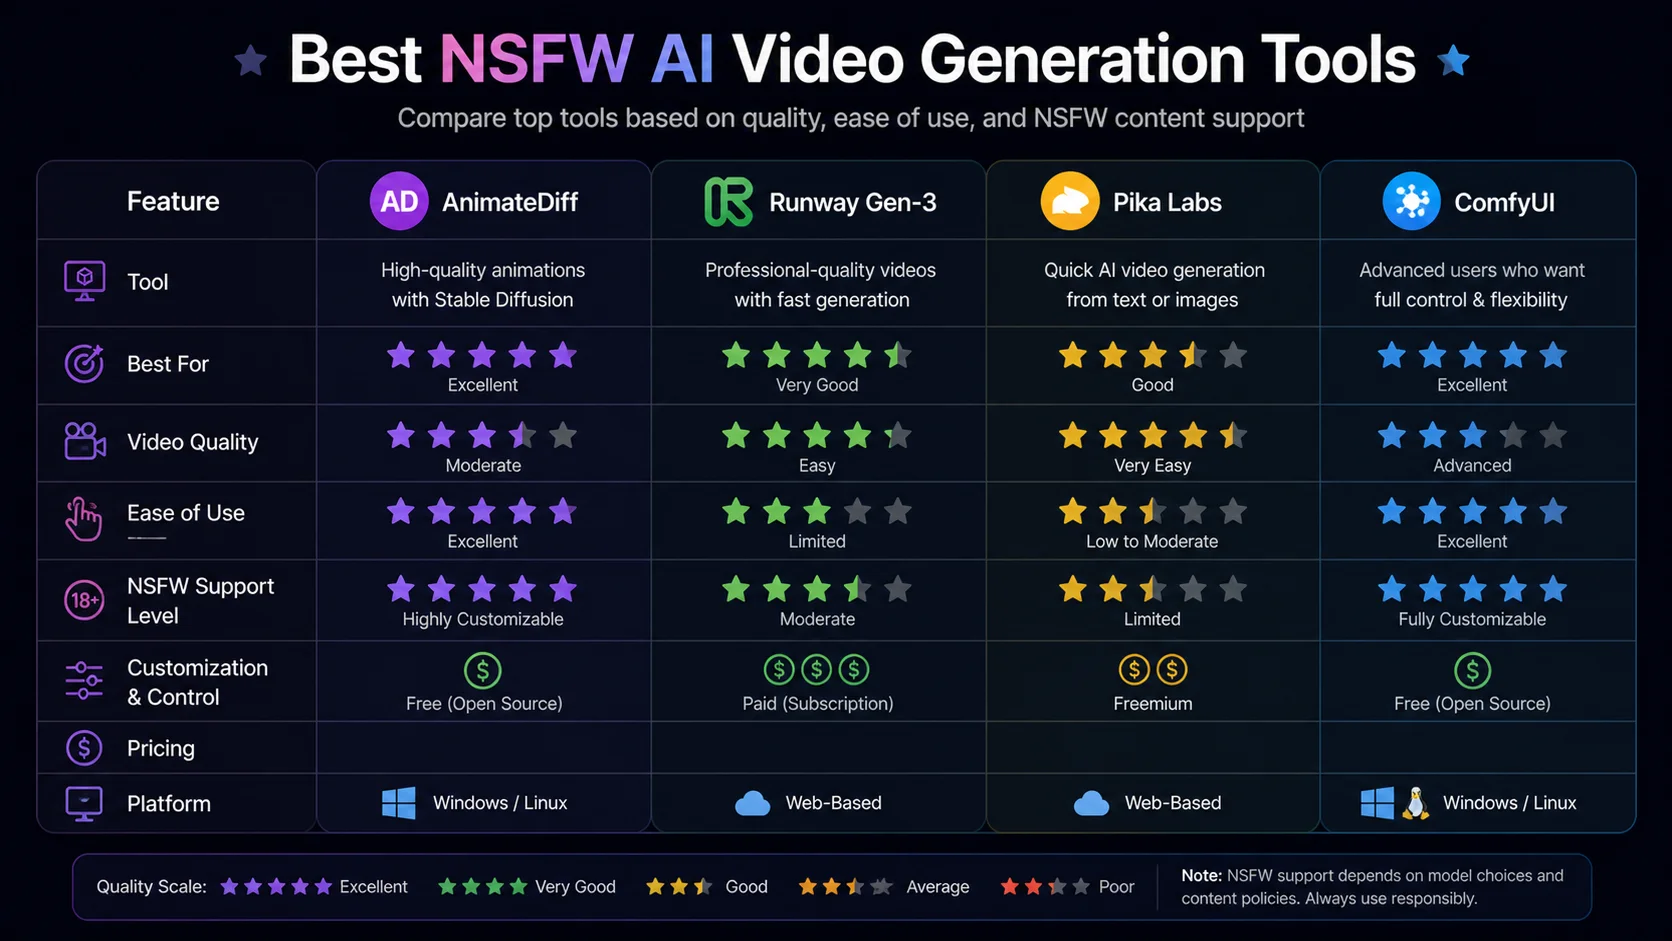
AnimateDiff (Open Source)
AnimateDiff plugs into existing Stable Diffusion workflows through Automatic1111 or ComfyUI. It adds motion modules to standard image generation checkpoints, letting you use familiar NSFW models (Realistic Vision, CyberRealistic, etc.) for video output. The learning curve is steep if you’re new to Stable Diffusion, but experienced users can start generating videos within an hour of installation.
Typical output: 16–32 frames at 512×768 resolution. With interpolation, this becomes 2–4 seconds of smooth video. Higher frame counts and resolutions require significant GPU power—12GB+ VRAM for comfortable operation.
Runway Gen-3
Runway is a commercial platform offering text-to-video and image-to-video generation. While Runway’s content policies restrict explicit NSFW content, it handles suggestive and artistic nudity with impressive quality. The motion coherence and visual fidelity are among the best available. For creators working at the boundary between art and explicit content, Runway produces professional-grade results.
Pika Labs
Pika generates short video clips from text or image inputs. Similar to Runway in approach, Pika’s content moderation is moderate. It handles artistic and softcore content well. The platform excels at smooth camera movements and natural-looking motion, making it useful for establishing shots and atmospheric sequences.
ComfyUI with Video Workflows
ComfyUI’s node-based interface allows construction of complex video generation pipelines. Combine AnimateDiff motion modules, ControlNet pose sequences, upscaling nodes, and frame interpolation into a single automated workflow. The initial setup takes hours, but once configured, you can generate high-quality NSFW videos with consistent results.
Community-shared workflows on platforms like CivitAI and OpenArt provide starting points that you can customize for your specific needs.
Node-based Stable Diffusion UI. Maximum control.
Dedicated NSFW Video Platforms
Several platforms specialize in NSFW AI video generation without content restrictions. These typically offer simpler interfaces than local Stable Diffusion setups, with pre-configured models and settings optimized for adult content. Quality varies between platforms—test free tiers before committing to subscriptions.
Step-by-Step: Generating Your First NSFW AI Video
Step 1: Define Your Scene
Before touching any tool, plan what you want. Video generation consumes significantly more compute resources than image generation, so random experimentation gets expensive fast (in time, credits, or GPU hours).
Decide on these elements before starting:
- Scene duration: Start with 2–3 seconds. Longer clips require more frames and increase the chance of consistency errors.
- Motion type: Simple movements (breathing, hair blowing, gentle swaying) produce better results than complex actions (walking, changing positions).
- Camera movement: Static camera is easiest. Slow pans and zooms work well. Fast camera movement causes artifacts.
- Character count: Single-character scenes maintain consistency better than multi-character interactions.
- Art style: Realistic or anime? This determines your model and settings choices.
Step 2: Generate a Strong Key Frame
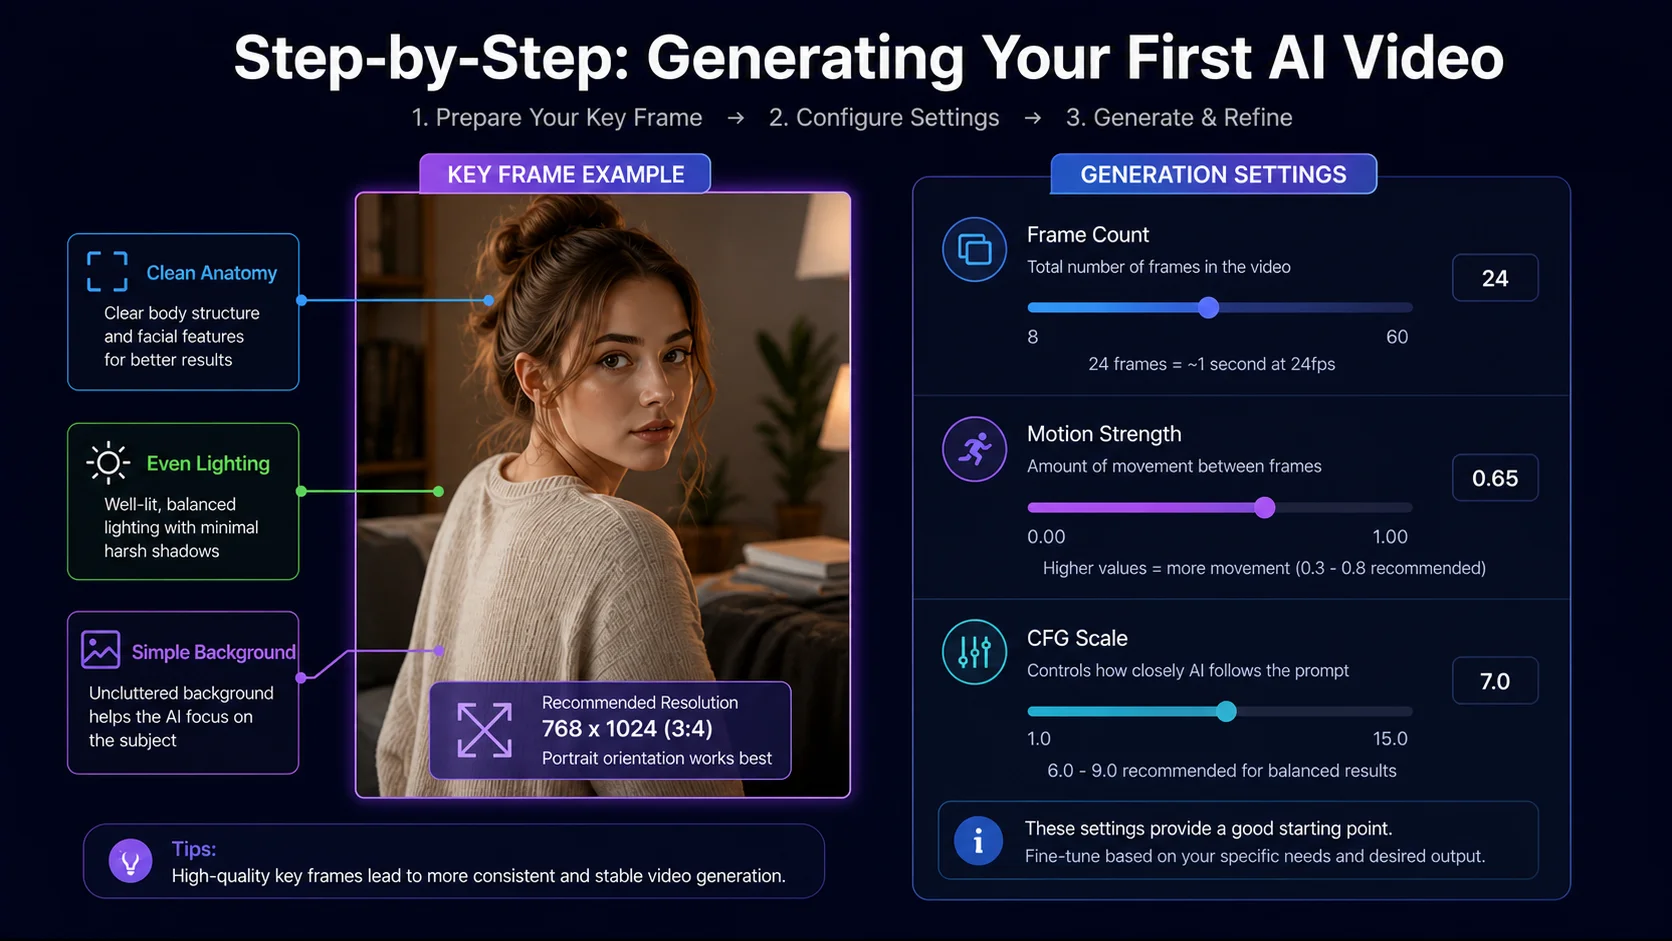
Most video generation tools produce better results when starting from a high-quality reference image rather than pure text. Generate a static NSFW image first using your preferred image generation tool. This key frame establishes the character’s appearance, pose, lighting, and scene composition.
Spend time perfecting this key frame. Fix any anatomical issues, ensure the lighting looks natural, and verify the composition works. Every flaw in the key frame gets amplified across dozens of video frames.
Recommended key frame specifications:
- Resolution: 768×1024 or higher for portrait orientation; 1024×768 for landscape
- Clean, artifact-free image with no distortions
- Neutral or natural pose (extreme poses cause motion artifacts)
- Even lighting without harsh shadows
Step 3: Configure Video Generation Settings
Each platform uses different terminology, but these core settings appear in most tools:
Frame count: How many individual frames the AI generates. 16 frames at 8fps = 2 seconds. 24 frames at 12fps = 2 seconds. More frames mean smoother but longer-to-render video.
Motion strength/scale: Controls how much movement occurs between frames. Low values (0.5–0.8) produce subtle motion like breathing. Medium values (0.9–1.2) create visible movement like swaying or turning. High values (1.3+) attempt dramatic motion but risk breaking consistency.
CFG scale: Same as image generation—how strictly the AI follows your prompt. Values between 6 and 9 work well for most NSFW video content. Too high causes oversaturation and artifacts.
Denoising strength: For image-to-video workflows, this controls how much the AI modifies your key frame. Start at 0.5–0.6 to preserve your key frame’s appearance while allowing natural motion.
Step 4: Write Your Motion Prompt
Video prompts need motion descriptors that image prompts don’t. Describe both the visual content and the movement.
Example prompt structure: “[visual description], [motion description], [quality tags]”
Sample prompt: “beautiful woman, long dark hair, natural lighting, indoor setting, soft smile, gentle breathing motion, subtle hair movement, wind effect, photorealistic, high quality, smooth motion, cinematic”
Avoid prompting complex actions in short clips. “Walking across a room” requires many frames and consistent full-body tracking that current models handle poorly. “Gentle head turn” or “slow breathing” works far better for short sequences.
Step 5: Generate and Evaluate
Run your first generation. Evaluate the output for these issues:
- Flickering: Rapid changes in color, brightness, or detail between frames. Fix by reducing motion strength or increasing frame overlap.
- Morphing: Features (especially faces and hands) shifting shape between frames. Fix by lowering denoising strength or using ControlNet for structural guidance.
- Frozen areas: Parts of the image that don’t move at all while everything else does. This looks unnatural. Adjust motion masks if available.
- Motion blur: Excessive blur during movement. Usually caused by too-high motion strength. Reduce the value incrementally.
- Temporal inconsistency: Clothing, hair, or body features appearing and disappearing between frames. Stronger key frame conditioning helps.
Step 6: Post-Processing
Raw AI video output almost always benefits from post-processing:
Frame interpolation: Tools like RIFE or FILM insert calculated intermediate frames between AI-generated frames, doubling or quadrupling the frame rate. A 16-frame, 8fps clip becomes a 64-frame, 32fps smooth video. This single step transforms choppy output into watchable content.
Upscaling: Apply Real-ESRGAN or similar video upscaling to increase resolution. Process each frame individually or use video-aware upscalers that maintain temporal consistency.
Color correction: Normalize brightness and color across all frames to eliminate subtle flickering. DaVinci Resolve (free version) handles this well.
Stabilization: If the video shows slight camera jitter, apply stabilization in any video editor. This removes distracting micro-movements the AI introduced.
Advanced Techniques
ControlNet-Guided Video
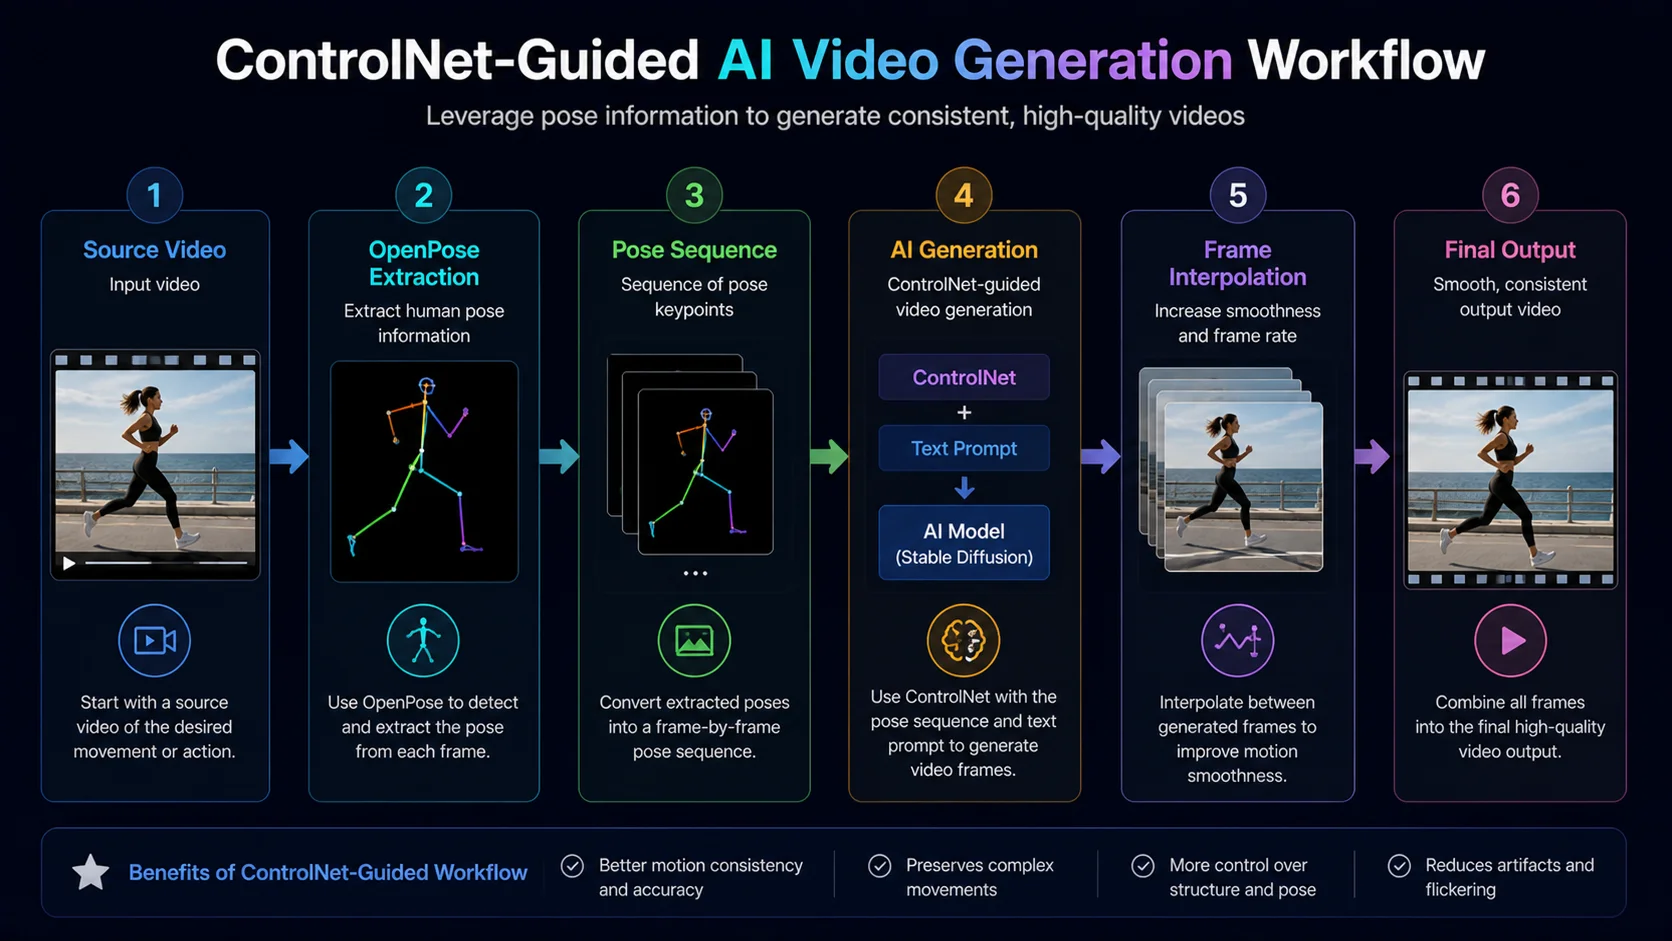
Extract a pose sequence from an existing video using OpenPose, then feed those poses into your AI video generation pipeline. The AI generates each frame matching the corresponding pose, producing motion that follows a realistic movement pattern. This technique solves the biggest challenge in AI video—natural-looking motion.
Workflow: source video → OpenPose extraction → pose sequence → ControlNet-guided generation with your NSFW model → frame interpolation → final output.
Looping Videos
Many NSFW video applications work best as seamless loops. AnimateDiff includes loop-friendly settings that ensure the last frame blends smoothly into the first. Enable these options and use cyclical motion prompts (breathing in and out, rocking motion, repeated gestures) for clean loops.
Multi-Clip Editing
Generate multiple short clips (2–3 seconds each) and edit them together in a video editor. This bypasses the consistency challenges of long-form generation. Each clip maintains internal consistency, and simple cuts between clips hide any character variations.
Use matching prompts and settings across all clips to maintain visual coherence. Same model, same CFG scale, same quality tags. Only change the motion descriptors and poses between clips.
Hardware Requirements
AI video generation demands significantly more computing power than image generation:
- Minimum GPU: NVIDIA RTX 3060 12GB for basic AnimateDiff generation at 512×768
- Recommended GPU: NVIDIA RTX 4080 16GB or RTX 4090 24GB for comfortable generation at higher resolutions
- RAM: 32GB system RAM minimum; 64GB recommended for complex workflows
- Storage: SSD storage for model files (individual models can exceed 5GB) and output files
- Alternative: Cloud GPU services (RunPod, Vast.ai) offer per-hour GPU rental for users without local hardware
Web-based platforms eliminate hardware requirements entirely but offer less control over models and settings. If you’re generating video occasionally, cloud platforms or web services make more economic sense than buying a dedicated GPU.
Troubleshooting Common Problems
Video Shows No Motion
Motion strength is set too low, or the motion module isn’t loaded correctly. Increase motion scale incrementally. In AnimateDiff, verify the motion module is selected and active in your pipeline.
Character Appearance Changes Between Frames
The most frustrating issue in AI video. Solutions: use image-to-video with a strong key frame instead of text-to-video. Lower denoising strength. Add specific character description details in your prompt. Use ControlNet with depth or pose guidance for structural consistency.
Output is Extremely Slow
Reduce frame count and resolution for test generations. Once you find settings that work, scale up for the final render. Enable xformers or other memory optimization in your Stable Diffusion setup. Close other GPU-intensive applications.
Faces Look Distorted During Motion
Faces are the hardest element to maintain across frames. Use face restoration tools (GFPGAN, CodeFormer) on individual frames after generation. Some AnimateDiff workflows include automatic face fix nodes that process each frame before assembly.
What to Expect from Current Technology
Set realistic expectations. Current AI video generation in 2026 produces impressive short clips—2 to 10 seconds of smooth, coherent motion. It does not yet produce feature-length videos, complex multi-character interactions, or physically accurate motion for athletic or dynamic scenes.
The technology improves month by month. Models that seemed cutting-edge six months ago already look dated compared to current releases. Starting now means you build skills and workflows that apply directly to better models as they arrive. The fundamentals—key frame quality, prompt engineering, motion settings, post-processing—remain constant even as the underlying models improve.
Begin with simple scenes, master the basics, and gradually increase complexity as your experience and the technology both advance.